Why VSCode and Cline?
VSCode is one of the most widely used code editors, and its ease of use makes it perfect for those getting started with coding or developing software! Combined with a plethora of extensions, VSCode can be very powerful and just as capable as full IDEs (integrated development environments) for many applications.
Cline is an open source AI coding agent tool, allowing users to utilize a vast selection of LLMs directly in their coding environment. As opposed to other chat-based tools, an agent like this is housed within development environment itself, allowing it to directly understand your codebase and execute complex tasks without additional tools. Unlike other coding agents, Cline innovates by not binding you to one specific LLM provider, truly giving control to the developer to use the tools they feel comfortable with.
In VSCode, installing Cline is as simple as adding the Cline extension from the extensions marketplace!
Installing VSCode
First, install the correct version of Visual Studio Code (VSCode) using the following link.
NOTE: be sure to install "Visual Studio Code" and not "Visual Studio". The latter is a full-featured IDE, and does not work with the Cline extension.
Once installed, open VSCode and explore the UI by opening or creating some folders/files. For a more detailed tutorial, check out Tutorial: Get started with Visual Studio Code.
Installing Cline
To install Cline in VSCode, first Open Extensions. To do this, you can either:
- press
Ctrl/Cmd + shift + Xor - find the
Extensionsicon in the leftmost Activity Bar, which should look like four squares with the upper right one rotated.
This will reveal a marketplace search bar, just type "Cline".
Finally, click the Install button under the extension title.
Once installation is complete, you should be able to access Cline by an icon in the activity bar that looks like this:

Or, open the Command Palette using Ctrl/Cmd + Shift + P and type Cline: Open In New Tab in the search bar.
Once Cline is running, you should be prompted to sign in or sign up and authenticate your Cline account. Once done, you're all set to start building!
Setting Up Cline
In the Cline window opened up, explore some of the UI. By clicking the gear icon you can open settings, from here you can select your preferred LLM API provider.
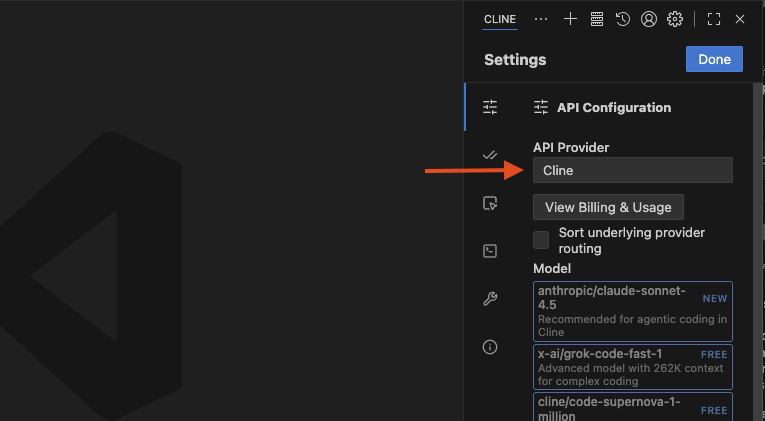
Once this is selected, you must Sign In and Add Your API Key! For Cline or open source models, you may not need an API key.
After you have been authenticated, you may now select your desired model from the available selection in the Model dropwdown. Some simple details about the model and its capabilities will be shown to help you decide. For more details and considerations on deciding the right model for your job, check out the Model Selection Guide from Cline.
Using Cline
Now you can start building! To get started, simply type your request into the Cline chat box, and press enter to submit! Make sure that you are in the folder of the codebase you are trying to edit! Some simple examples:
- "Create a text entry box on the homepage of my app using React"
- "Debug the errors in my main.py file"
- "Refactor the code to make it more concise and readable"
Simply press enter or click the send icon to submit and watch the agent get to work making changes!